
What is a VoIP Gateway?
A VoIP gateway is a device that uses Internet Protocols to transmit and receive voice communications.
A VoIP Gateway is used to convert voice and fax calls, in real-time, between the traditional network (PSTN) and an IP network. Traffic coming in from the traditional network (PSTN) is fed through a VoIP gateway and converted to digital packets and sent to the IP network.

How to Use a VoIP Gateway?
VoIP gateways have been designed with different purposes, basically come in two types: Analog and Digital.
Analog gateways
- Connect the VoIP phone system to the Analog Phones (Traditional)
- Connect the VoIP phone system to the traditional telephone networks (PSTN).
Digital gateways
- Connect a VoIP phone system to The Digital voice lines
- Connect a PABX phone system (traditional) to an VoIP network.

How to access the web configuration?
- HX4E/MX8A/HX4G/MX8G Gateways start DHCP service by default, and automatically obtain an IP address on the LAN; you can use the factory-default gateway IP address if it is unable to be obtained (e.g. when connected directly with a computer).
- By default, the MX60E/MX120G uses a static IP address.

Enter the gateway IP address and verification code (case-insensitive) in the browser address bar (e.g. 192.168.1.203). You can enter the gateway configuration login interface by entering a password on the login interface:
- User = Admin
- Passwords = hx4
- Random code = i4Jt
- Finish = Login

- The administrator is allowed to browse and modify any configuration parameter and modify login passwords. After login, “Admin” is displayed on the upper left corner of the interface.
- The operator is allowed to browse a subset of the configuration parameters. After login, “Operator” is displayed on the upper left corner of the interface.

Setup Guidelines
After login, click Basic >Network to open the configuration interface.

.Example:

Click Basic > SIP to open the configuration interface.
- The B3’s customers want to keep using their PSTN number.
- The User from a traditional PBX wants to connect with B3’s extension.
- Customer is able to continue using their existing traditional PBX investments while adding new extensions in Cloud PBX to support mobility, call center and other business use cases.
- Both the traditional PBX and Cloud extensions can inter-operate and call each other seamlessly via extension numbers with no call charges.
- Calls from Cloud to the traditional PBX will show the exact caller ID.
- Calls from the traditional PBX to Cloud can only show 1 caller ID.


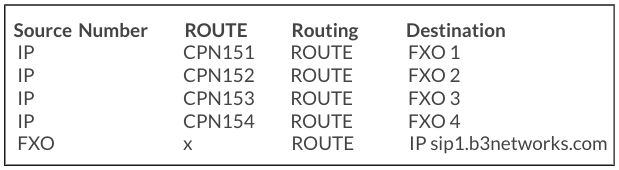
- After login, click Routing > Digit Map to open the dialing rules interface. Should be used by default.
- Dialing rules are used to effectively detect completed received number sequences that are ready to be sent in order to reduce the connection time of telephone calls.

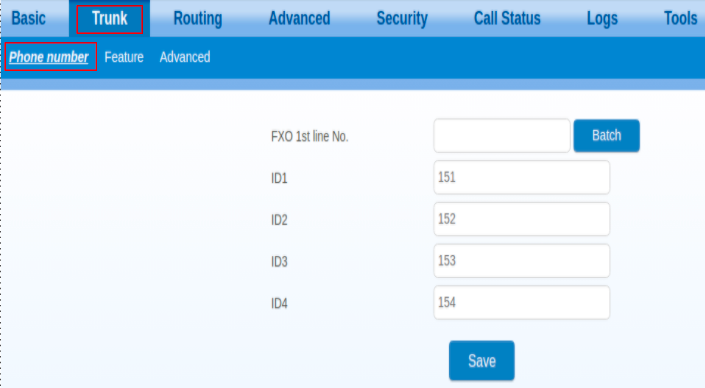
Example:

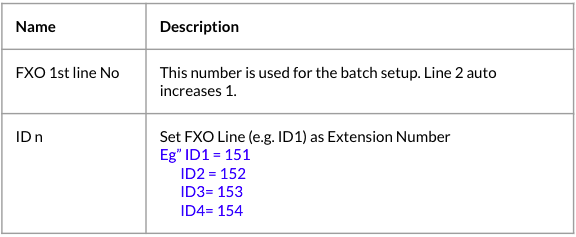
- CPN must be the traditional PBX Extension Number.
- Each CPN / Extension Number must be mapped to 1 FXO Port.
- Calling Party Number = Caller Number
- Called Party Number = Destination Number


- When customers have many Analog phones and they don’t want to leave them
- Customer is able to continue using their existing traditional Analog phone while adding new extensions in Cloud PBX to support mobility, call center and other business use cases.
- Both the traditional Analog Phone extensions and Cloud extensions can inter-operate and call each other seamlessly via extension numbers with no call charges.
- Calls from Cloud to the traditional Analog phone will show the exact caller ID.
- Calls from the traditional analog phone to Cloud will show the exact caller ID.


- Step 1: Click the icon, the following interface is shown > Choose batch configured features > OK
- Step 2: Click Save


- Called Party Number must be the traditional PBX Extension Number.
- Each Called Party Number / Extension Number must be mapped to 1 FXS Port.
- Calling Party Number = Caller Number
- Called Party Number = Destination Number

After login, click Security > Access to open the configuration interface.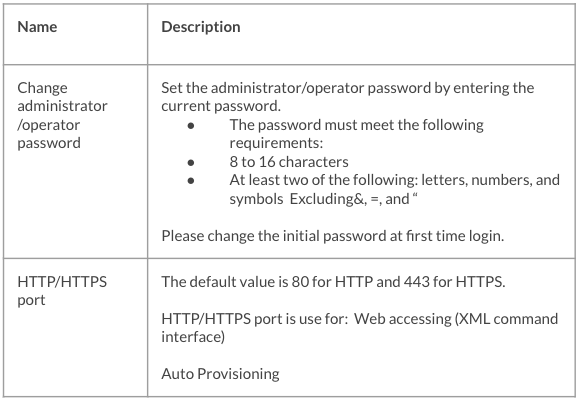
Example:

- Information regarding login interface (including IP address and permissions of the user)
- SIP registration status
- Call-related signaling and media (RTP) information

After login, click Tools > Configuration Management to open the configuration interface.


- Step 1: Click Tools > Software upgrade > Choose file to choose.
- Step 2: Click Backup to save the current configuration.
- Step 3: Click Upgrade and follow the upgrade instructions.